


.png)

Redlining is an essential skill for any legal professional, allowing you to track document changes. Microsoft Word is one of the most widely used tools to redline contracts and other legal documents, so we’ve put together a step-by-step guide on how to redline in Word. If you need to compare a redlined document with the original version, you can use Word’s Compare feature or a specialised redline comparison tool like Draftable Legal. Read on to find out how to redline in Word and use Draftable Legal for redline comparisons.
How to redline in Word
Step 1: Turn on Track Changes
- After opening on the document you want to redline in Microsoft Word, navigate to the Review tab in the ribbon at the top of Word.
- In the Review tab, click on Track Changes. You can toggle this feature on or off by clicking the button again.
- A shortcut to turn on Track Changes is by pressing Ctrl + Shift + E on your keyboard (Windows) or Cmd + Shift + E (Mac).
Step 2: Make your edits
Start editing your document as needed.
- Insertions: Any new text you add will be underlined or shown in a different colour.
- Deletions: Text you delete will either be struck through or moved to the margin.
- Formatting Changes: Changes like bolding or italicising text will also be tracked.
Step 3: Review changes
To view the changes, you can switch between different views:
- Simple Markup: Shows the final version with indicators where changes have been made.
- All Markup: Shows all tracked changes with detailed markup.
- No Markup: Shows the document without any tracked changes.
- Original: Shows the document as it was before any changes were made.
Step 4: Accept or reject changes
Once all edits are made, you can review and finalise the document:
- In the Review tab, use the Accept and Reject buttons to either accept or reject individual changes.
- You can also accept or reject all changes in one go by clicking the down arrow next to these buttons and choosing Accept All Changes or Reject All Changes.
- The document can then be reviewed in Final View to see the document with all accepted changes.
Tips for effective redlining in Word
1. Customise your tracking options
While "redlining" typically refers to the traditional view of changes, Word allows you to customise how changes appear. For example, you can choose different colours, underline additions, or strikethrough deletions instead of using red lines. You can also assign different colours to changes made by different reviewers, it easy to distinguish who made each edit. Here’s how to do it:
- Click the drop-down arrow next to Track Changes in the Review tab to open more options.
- Select Change Tracking Options or Track Changes Options depending on your Word version. Here, you can choose how changes are displayed, such as different colours for insertions and deletions, and whether formatting changes should be tracked.
2. Use comments
You can add comments by highlighting the text and clicking New Comment in the Review tab. Comments are especially useful in legal documents, where understanding the reason behind a change is as important as the change itself.
3. Lock Track Changes
If you're collaborating on a document with others and want to ensure that every change is tracked, you can lock Track Changes. This prevents others from turning off the feature and helps maintain the integrity of the redlining process.
4. Use the Reviewing Pane
For a detailed view of all changes, including a list format, you can use the Reviewing Pane. This pane can be especially useful for documents with extensive changes, making it easier to navigate and understand the edits.
5. Compare documents
If you receive a document that has not been tracked but you need to see the differences between versions, you can use Word's Compare feature. This tool will allow you to compare two versions of a document and show the differences as tracked changes.
If you need to compare two documents and produce a redline comparison output with the changes highlighted, you’ll need a specialist tool like Draftable Legal.
What is the best redline software for comparing documents?
Draftable Legal is one of the best solutions for legal redline comparisons. With Draftable Legal, you can generate a redline comparison with deletions, insertions and moved text shown in distinct formatting and colours to make it easy to identify changes at a glance.
Several redline comparison types are available, including Redline in Draftable and Redline in Word. Excel Redline is available for testing, and PowerPoint Redline is coming soon.
Redline in Draftable
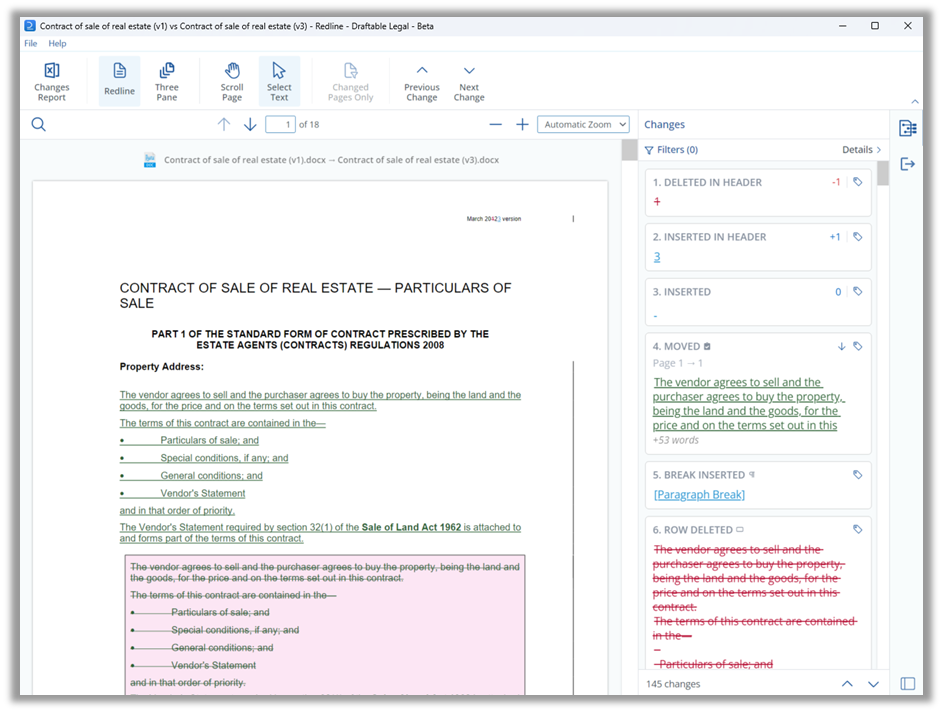
This is our recommended redline output option for users comparing Word and PDF files. It opens in Draftable’s purpose-built Comparison Viewer with advanced review features including an interactive Change List, the ability to add tags and notes to changes, the ability to show and hide unchanged pages, and the ability to see changes in context with older, newer and redlined documents in one screen with our Three-Pane View feature. Once you have reviewed your comparison output, you can choose to email, print, save to DMS, or copy to clipboard using any of the export formats (including PDF, PDF changed pages only, Word with Tracked Changes, or Word without Tracked changes).
Redline in Word
This redline output option is ideal for users who prefer to work in Word and want the ability to create Word files without tracked changes. This feature allows users to present markups as static redline (with no associated metadata) and is useful when using metadata cleaning tools or when needing to maintain the markup schema in your Profile, regardless of external party settings. Once you’ve reviewed your comparison, you can choose to open in Word, save locally or to your DMS, generate an email with the file attached, or copy the file to clipboard.
Excel Redline
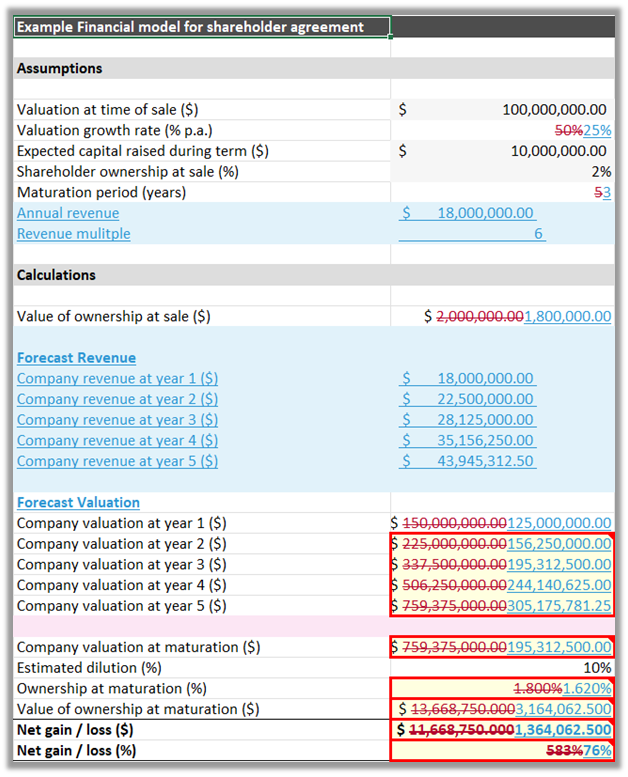
Excel Redline is a new (preview) feature that allows users to compare Excel documents and produce a redline output in an Excel (.xlsx) file. Users can see changes in values, formulas and formatting changes (such as column and row insertions and deletions) in detail.
You can access this preview feature by contacting your account executive or by emailing product@draftable.com. Our Product team will be collecting feedback on this preview feature to make additional improvements before releasing it to all Draftable users.
PowerPoint Redline
Hot off the heels of our Excel Redline release, our team are in the advanced stages of a new PowerPoint Redline output. Users will soon be able to compare PowerPoint documents and produce a redline output in a PowerPoint (.pptx) file that shows markup in text, tables and images.
Email our team at product@draftable.com if you’d like to preview this feature.
You can also start a free five-day trial of Draftable Legal, with all features included, to see if it’s right for you.
